
Blog Entry 1: Laser Cutting


Welcome everybody to my first blog entry for CP5070. In this blog entry I will be sharing what I have learnt as well as my experience using the laser cutter during the laser cutting competency test.

BACKGROUND INFORMATION

Laser cutters utilises a concentrated laser beam which hits the surface of a material and heats it strongly until it melts or vaporises. Once the laser beam has penetrated the material, the cutting process can begin.

The benefits of using a laser cutter include:

  • The laser beam is able to provide high levels of precision and accuracy which allows more complex designs to be etched on smaller designs while still having a clean cut.
  • There are less waste and contamination that is produced
  • The laser allows for cutting of difficult to cut materials
NOTABLE SAFETY HAZARDS

Laser cutting comes with inherent safety risks and hazards. It is important for users to take note and understand the the hazards associated to laser cutting and the safety control measures that it has.
The table below lists 4 of the important hazards with laser cutting:

Hazards

Safety control measures

Pictures to support the explanation

1. Fire Hazards

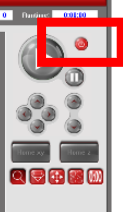
Engineering Control

1) Fire extinguishers are placed in the laser cutting room

2) Emergency stop button can be used to stop the power to the laser cutter

Administrative Control

1) Students are taught what to do during fire .

2) Signs are everywhere informing users what to do during fire.


2. Chemical Hazard (toxic gases being produced)

 Engineering Control

1) Fume extractor must be turned on to remove toxic gases produced during laser cutting

Administrative Control

1) Students are taught not to immediately open the lid after cutting operation completes to prevent breathing in of the toxic gases.


3. Physical hazard to users eyes if staring at laser beam during printing

 Administrative Control

1) Staffs and learning package will inform the users not to stare into the laser beam during cutting operation


4. Physical hazard (getting burnt by laser beam)

 Engineering Control

1) Laser cutter turns off if the lid is open during cutting operation

Administrative Control

1) Staffs and learning package will inform the dangers of putting their arms in the laser cutter during the cutting operation.


Now that I have learnt about the safety measures of laser cutting, I am more aware of what to not do in the workshop when using the laser cutter.

MATERIAL SELECTION


Next, I learn about the types of materials that are commonly used in laser cutting.
It includes: 

Material

Photo of material

1. Paper/White card


2. Cardboard


3. Balsa wood


4. Acrylic


5. Plywood


There are also limitation on what materials the laser cutter can be used on:
        

Material

Photo of material

1. PVC


2. Metal

3. Foam


4. Rubber


Additional note: The allowed material thickness for cut is maximum 5mm

OPERATION OF UNIVERSAL LASER CUTTER

Now that I know about the safety hazards and know what material can be picked, I can begin operation using the UNIVERSAL laser cutter!

The first step to using the laser cutting is to always start with turning on the compressor, laser cutter machine and fume extractor.

Steps and description

Photos to support the description

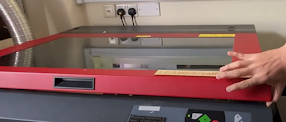
1. Switch on the power for laser cutter, Air assist and Extractor (located behind pc in MAKERSPACE)


2. Switch on the fume extractor (located in the left side of the laser cutter room in MAKERSPACE)


Next, I will be using Corel Draw to import a file and modify the lines and fill for cutting and engraving.

Steps and description

Photos to support the description

1. Select File > Import > Select .DXF file > press Import


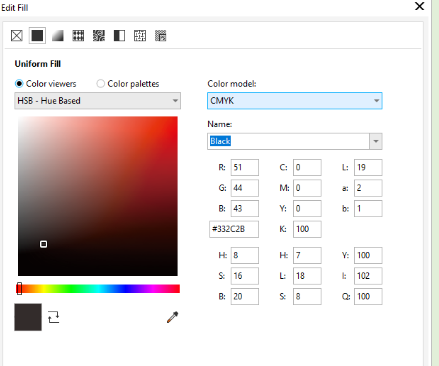
2. Deciding the settings for cutting or engraving 

Key settings: 


Tools can be found on the bottom bar of Corel Draw

 Fill Tool is for engraving 

Outline Pen is for Vector cutting or Vector engraving


After this the Corel Draw drawing can be sent to the laser cutting software and set the laser cutter power, speed, PPI in the software.

Steps and description

Photos to support the description

1. Select File > Print 


2. Click on the cogwheel to access settings


3. In the settings, Select LOAD for more settings


4. Select the file with presets according to the material that matches the thickness and type that you have chosen.


5. Setting the Power, Speed and PPI 

Power: adjusts the output power of the laser

Speed: adjusts how fast the laser head moves

PPI: adjusts how many times the laser pulses over a given distance during the cutting process

* In this case the settings will be auto selected


Once done click OK


The universal control panel can now be accessed to start the cutting progress.

Steps and description

Photos to support the description

1. Understanding the 4 Essential tools

* Duplicate is not used for our purposes

Starting up the laser cutter


2. Using the Move tool, select the coordinates where you want to start cutting.

There is a ruler inside the UNIVERSAL laser cutter which can be referenced to find the coordinates desired.


3. Use the Focus tool to ensure that the coordinates selected are available workplace on the material.

There will be an indicator from the laser on where the chosen coordinates is.


4. Shut the lid of the laser cutter gently once everything have been set.


5. Press the play button on the UNIVERSAL control panel or on the actual machine to begin cutting.


Fires are not rare when operating laser cutters, hence it is mandatory for all users to understand the DO and DONTS when a fire occurs.

DOs

DONTS

1. When there is a small/negligible fire, attempt to blow it out.

1. Do not neglect a fire if it does not die out within 1-2 seconds.

2. When there is an uncontrollable fire, use a fire extinguisher to put it out

2. Do not attempt to solve the fire problem by yourself, inform the staff.

3. Remove the material if fire is unable to be put out and place it on the floor to step on and put out the fire.


4. Lift the lid of the laser cutter and stop cutting operation if flame persists.


LEARNING REFLECTIONS
This have been an extremely fun experience for me and I will certainly take the skills I have learnt and apply it to my future endeavors. Based on my experience from 3D printing from CP5065 I know that initially I will struggle with Laser Cutting as both are actually quite similar in nature. This actually led me to failing my first attempt in the competency test. However, now that I have gained hands on experience as well as important advice from my teachers, I am much more confident with using the laser cutter. I am thankful for the second attempt as well as the advice by my teachers. 

There is definitely much more complex things that can be done using the laser cutter as I only used the preset files during the competency test. I know that the skills I have gained in CP 5065 on how to use FUSION 360 can be applied here as the design I create on Fusion can be created using laser cutting. This also means that the designs I create in FUSION 360 can be much more complex due to laser cutting allowing more precise designs.

Thank you for reading my blog on laser cutting! Please stay tuned for my next blog! Bye!

Comments

Popular posts from this blog

ABOUT ME

 Hello everybody!  I am Chang Ji Hinn, in this blog I will be documenting my journey through CP5070, Chemical Product Design & Development. My goal for this module is to hone my skills on creating a chemical product and developing a prototype. I am also looking forward to learning about Arduino programming as this will be my first time being exposed to it. In order to accomplish my goals, I will have to use the available resources on Brightspace to learn about Arduino programming as well as exploring the program and gadgets at my own time. To improve my skills in developing a prototype, I will need to work closely with my team to come up with great ideas on how to improve our product while at the same time cultivating my own skills using 3D printers and laser cutter. I will know that I have accomplished my goals for this module if I am able to fully utilise and understand the coding and uno maker kit for the Arduino programming and having created a design that I am proud o...

Blog Entry 4 - Design Of Experiment

Welcome back everyone! In this blog entry I will be solving a case study using Design Of Experiments as well as sharing my reflections for DOE and the practical I did. What is Design Of Experiment?  It is a statistics-based approach to designing experiments A methodology used to obtain knowledge of a multi-variable process in fewest trials possible It is the backbone of product design Types of data analysis Full factorial data analysis Using data gathered from all possible runs  More accurate due to larger sample size Fractional factorial data analysis Uses data gathered from selected possible runs More efficient and resource-effective Case study In this case study, I will be investigating the cause of the loss in popcorn yield. Three factors have been identified as the possible cause. They are: Diameter of bowls to contain the corn Microwaving time Power setting of microwave In order to determine the impact of each factor, experiments will be conducted with each of ...

Blog Entry 6: Project Development

Welcome back everybody to my final blog! For this blog I will be documenting my group's semester long journey in creating a chemical product. My group consists of Brice, Devin, Yuhan and myself! Our group will be creating a door handle steriliser. 1)  Our team's Chemical Device             Chemical Device: Door handle steriliser Project Background:  Door handles are a significant culprit in the spreading of viruses and bacteria. This is because everyone must touch them to open the door, and they rarely get cleaned since they do not look dirty to the naked eye. Also, most door handles are made of stainless steel, which is a perfect material for bacteria to cultivate on. Some examples of viruses that can spread are the coronavirus (COVID-19), norovirus, hand foot and mouth disease, and influenza.           To emphasise, ever since COVID-19 started, the need for sterilisation tools/equipment/media to minimise its s...